Sometimes we must abandon everything we know about a particular asana to be open
to exploring all aspects of the shape. When I work with clients in Madukasana (Frog Pose),
It’s my job to not only teach them the very best safest version, but to also help them
understand why this version of Mandukasana is safest for their knees, back and hips.
For a true frog to jump the lengths that it does, it uses it’s legs like springs. You can
check out this movement phenomenon. The frog must push the hips back to bring the
gluteals to maximum stretch, knees flexed for maximum quadriceps stretch and ankles
flexed for maximum stretch to the achilles to load the tendon mechanism for maximum
flight at take off. Think of Mandukasana as the moment before take off, rather than a
collapsed, lifeless frog.
Mandukasana is a deep stretch for the short adductors of the groins/hips (inner hip
musculature) and although it is not considered a beginning posture, It can be accessed
by all levels of students provided there is adequate warm up and use of props. It is used
to create more free space in the hip joints and in this way can be helpful in lower back
and knee problems where lack of hip mobility is primary. It can also be used to isolate
and strengthen the hard to locate and difficult to strengthen internal rotators of the hips.
It is therapeutic for all the abdominal organs and particularly for the pancreas. It is also
useful for relieving menstrual cramps. It can be extremely helpful for those suffering
from sciatica caused by a tight piriformis. Use caution in Mandukasana in the case of
new knee, hip, back or ankle surgery. If the ankle has been fused (triple arthrodesis),
you will need to prop the ankle as there won’t be enough dorsiflexion for the foot to
come against the wall. A small towel roll is useful for this.
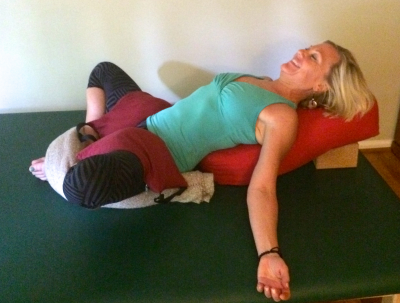
#1: Center Yourself:
As with any Yoga Practice, begin with your opening centering and breath work
(pranayama). Take this opening work in supported Supta Baddha Konasana to allow the
psoas and groins to soften and let go. In this way you will have a more lasting benefit to
the therapeutic posture.
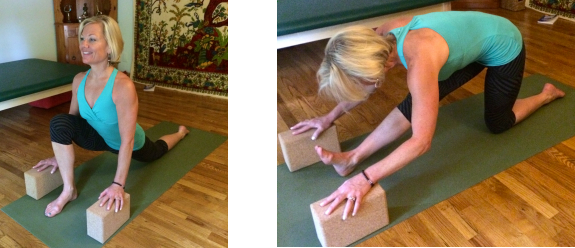
#2: Warm up your hips:
Pick and choose your favorites, but you can use any combination of seated hip circles,
hips circles on hands and knees, crawling twist and move gently into kriyas (movement
flows), that further soften and open the hips like this knee down lunge kriya.
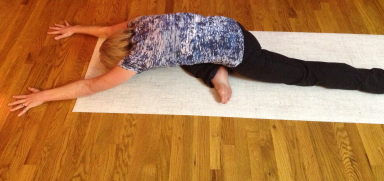
Pause between sides in wide leg supported Balasana, (Child’s Pose) to feel how you are
progressing.

Add some more challenging asana specific to hip opening like Eka Pada Raja Kapotasana, (Single Leg King Pigeon).
Baddha Konasana, (Cobbler’s Pose), supported on a blanket is wonderful for softening the groins in
preparation for Mandukasana.
#3: Find a clear wall:
Prepare for Mandukasana by folding a blanket or mat to protect your knees and placing
that close to the wall.
Place the bottom of the feet against the wall knees COMFORTABLY wide (remember you
will be exploring here awhile).
If your ankles are tight and the feet have a hard time against the wall support them in as
much flex as you have available to you. Remember no frog ever jumped with their feet
pointed under them. You need the leverage of the wall.
#4: Hips Back:
Soften the groins so the hips empty toward the wall a bit. Think frog about to jump.
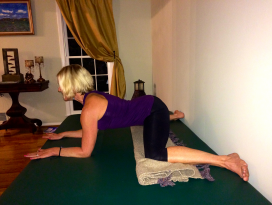
Having the hips too far forward can cause the lower back to collapse and put
unnecessary strain on the shoulders and low back. In the image below, her hips are too
far forward, the knees should come instead to a 90 degree bend, and the low back
should not collapse.

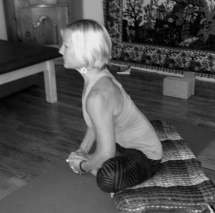
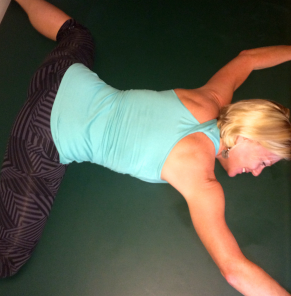
Here’s another common mistake: A collapsed frog cannot jump.
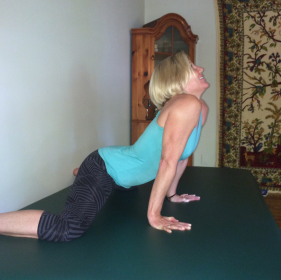
Here’s one more common error in Mandukasana: Her elbows are straight and this will
bring tension into the neck and shoulders. The lower back is also collapsed here
resulting in compression rather than space.
#5: Pull the ribs slightly forward to create space:
Engage enough in the scapular stabilizers! It’s as if you are gently pulling the lower ribs
to the wall in front of you. You will be on your elbows. Keep the hips back and the ribs
forward so you can fill the space created with breath and mini schnauzer love.

#6: Go exploring:
Notice what it may feel like to isometrically contract the adductors by gently squeezing
the knees towards each other in the posture. Now try pulling them apart isometrically
(no movement). Stay with what feels better.
On your next inhale, try lifting one ankle off the ground (keep the knee down). Exhale to
lower. This will inform you of the strength of your hip internal rotators. Do the same on
the other side. Notice any differences. If you can do that without pain, try lifting both
ankles (keep the hips back, groins soft). In the image below, I am lifting my left foot only.
To come out: You never want to pop out of Mandukasana too quickly. Take your time!
Bring the big toes to touch first and then walk your hands back toward the hips. Take
some hip circles on hands and knees or easy windshield wiper legs after Mandukasana.
Counterposes:
Balasana (Child’s Pose) knees together
Udarakarshanasana (knee down twist)
Be sure to give yourself a good long hug and an even longer Shavasana to integrate the
work done in Mandukasana.
 Lisa Hughes received her B.S. in Physical Therapy from Northeastern University in 1986. She graduated Magna Cum Laude. While growing up in Boston, Lisa was a competitive gymnast for eleven years. Lisa has over twenty-eight years of experience as a Physical Therapist in a variety of clinical settings and specialized in Sports Medicine for fifteen years. While working with the head of the American College of Sports Medicine at the Sports Medicine Clinic in Children’s Hospital Boston, Lisa specialized in the treatment of the growing athlete. Lisa also has rehabilitated professional football players from the New England Patriots and Cincinnati Bengals, dancers from the Boston Ballet Company, and elite level gymnasts, runners and cyclists.
Lisa specializes in treating the whole client, integrating the traditional Physical Therapy modalities of Neurophysiological Manipulation and Myofascial Release with Yoga Therapy. She is currently pursuing her Yoga Alliance 500 hour Yoga Therapy Certification through Pranakriya School of Yoga Healing Arts and sees private Yoga Therapy clients at her home based business, No Boundaries Yoga Therapy. Her blog blends her 28 years of Physical Therapy knowledge with the direct experience of Yoga Therapy. She is a certified Mat Pilates instructor, a certified strength training specialist, a GYROTONIC® certified instructor, and has completed a course on the GYROTONER®, a specialized piece of GYROTONIC® equipment.
She is a volunteer with the Challenged Athletes Foundation, whose mission it is to provide opportunities and supportto people with physical disabilities so they can pursue active lifestyles through physical fitness and competitive athletics. Lisa can be reached at No Boundaries Yoga Therapy.
Interested in writing for My Yoga Scene? Reach out!
Thank you for this informative article! I love frog and this will definitely help me achieve the benefits!